Geocoding: Turning addresses into geographic features for mapping

Map of Devastating 2003 Heat Wave in the Netherlands Observed from MODIS Satellite. Mehdi Aminipouri (PhD Candidate in Geography at SFU)

What is Geocoding?  

Geocoding is the process of converting location descriptions, such as addresses, into geographic coordinates that can be displayed on a map. This process is used in Geographic Information Systems (GIS) to accurately place features and data on a map. Geocoding can be done using various software, such as GIS platforms, geocoding tools, or geocoding services. 

The typical geocoding process matches an address or location description to a latitude and longitude coordinate. The accuracy of the resulting geographic coordinates can be impacted by the quality of the input data and the method used for geocoding. Batch geocoding involves processing multiple addresses or place names at once, while reverse geocoding determines the closest street address or place name from geographic coordinates. 
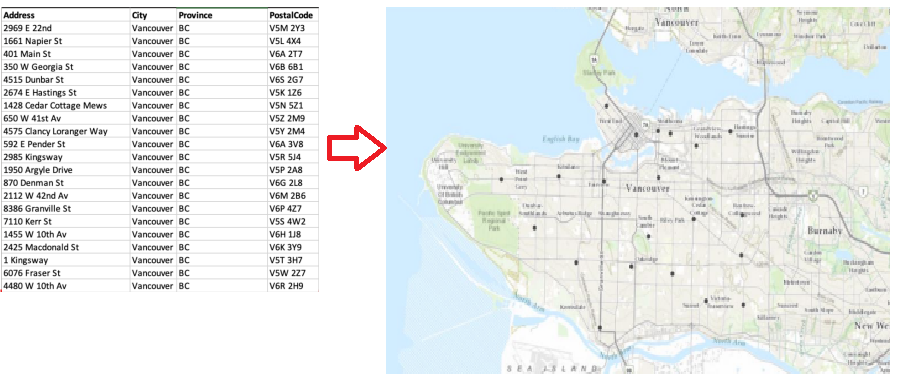
geocoding a visual expression

Geocoding tools 

Brower-based free Geocoding services

BC Address Geocoder
Use the Address List Editor to geocode fewer than one thousand addresses. Supports batch geocoding. 

Geocodio
Geocode up to 2,500 US and Canadian addresses per day for free. Supports batch geocoding. 

Programming languages 

Geocoder and Geopy are two popular Python libraries for geocoding. Note that they are not Geocoding services but simply a python client for several popular geocoding web services. 

ArcGIS World Geocoding Service (restricted to SFU users)

Sample data: Format address data correctly and download a sample file

The demonstration below uses a .csv file called "Libraries.csv," which contains the address information of 22 libraries in four fields: Address, City, Province, and Postal Code. It is important to format address data correctly, as incorrect formatting and parsing of information can cause issues during the geocoding process. To highlight this, note the differences between two .csv files below. 
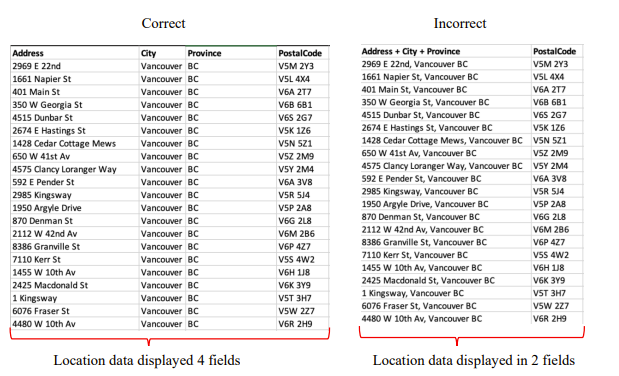
sample data for geocoding

Download the sample data 

Using ArcGIS  World Geocoding Service will consume ArcGIS Online credits. Your SFU ArcGIS Online account is assigned 500 credits by default. ArcGIS World Geocoding Service uses 40 credits per 1,000 addresses geocoded (for more details, see ArcGIS - Understanding Credits). If you need more credits, please contact gis-software@sfu.ca. 

Learn how to access the ArcGIS World Geocoding Service through ArcGIS Online

ArcGIS Online provides an intuitive user interface for geocoding addresses to geographic points on a map. This method is ideal for small datasets, such as the address data for public library locations in Vancouver, British Columbia, which will be used in this demonstration. ArcGIS online allows us to easily upload data, share projects, and collaborate with others in our institution. The platform also offers an easy-to-use alternative to GIS software like ArcGIS Pro and QGIS for basic mapping and spatial analysis. 

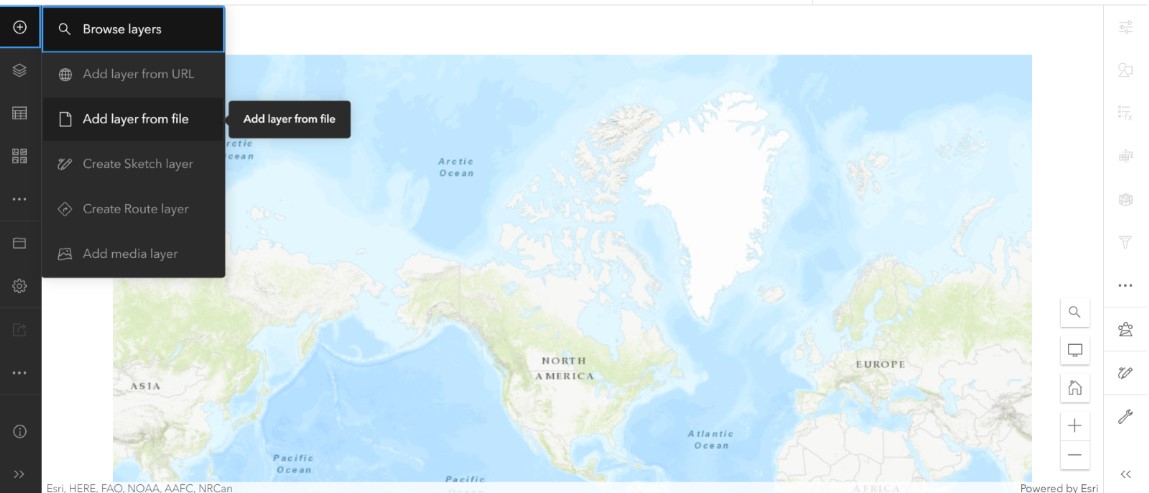
To access the Mapping page for ArcGIS online, select the Map Viewer application from the Map tab.  

  • Add => Add layer from File 
  • Select Choose File and navigate to where you have saved Libraries.csv 
  • Import Layer
  • Select Create a hosted feature layer and add it to the map
  • Ensure address is selected

ArcGIS Online will recognize that this data is in .csv format and ask us to specify how we would like to locate our features. It has also recognized that there is a field named “Address” that is likely classified as a “Address of Place” Location Fields. 

  • Select Addresses or Places 
  • In: World 
  • Field Name: Address 
  • Location fields: Address or Place 
  • Click Add Layer 

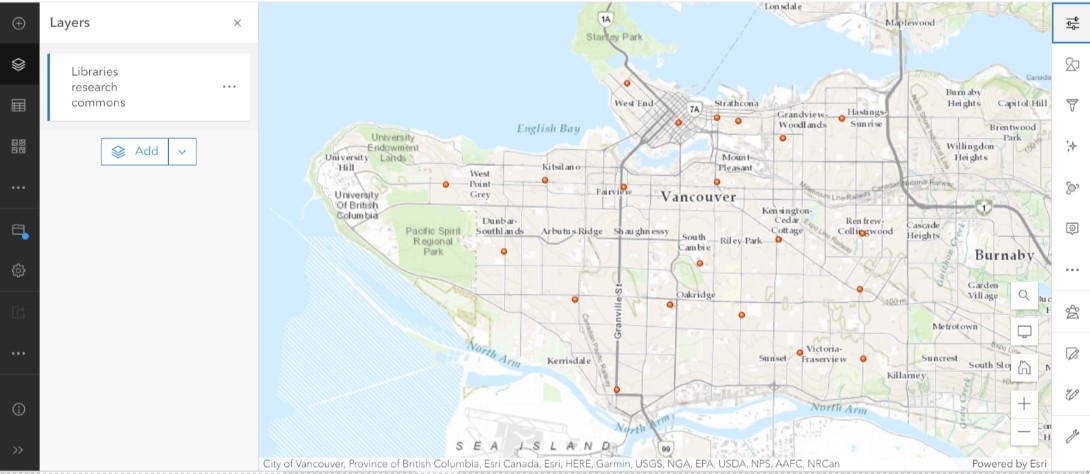
You will now see the library locations displayed as points on the map canvas of ArcGIS online. We can change the style of the point data, choose an attribute to display, and select a symbology type. 

Our new point layer for Vancouver libraries is has now been added to the Contents window to the left of the map canvas. From here we can access the attribute table, change the symbology, and apply analysis tools to the layer.  

Next, we will learn how to download this geocoded data from ArcGIS online to a shapefile for use in another GIS software. ArcGIS online offers a method for easily opening geographic data stored online in ArcGIS Pro. However, we will review how to download the data in a shapefile format that can then be used in a variety of GIS software. 

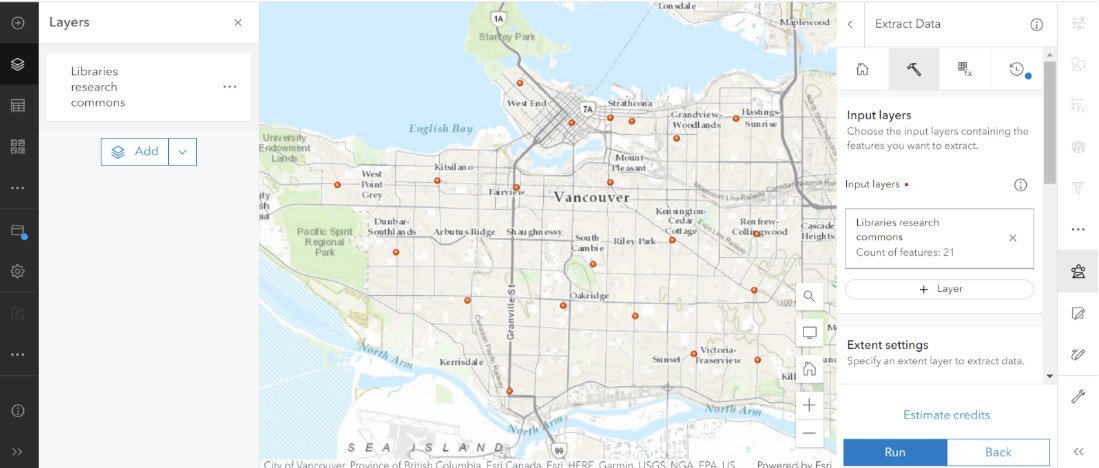
​​​​​Be sure your Libraries layer is select then navigate to Analysis => Feature Analysis => Manage Data => Extract Data. This will open a new window to set parameters for the data we want to extract. 

  • Layers to extract: Libraries  
  • Study area: Same as Display  
  • Output data format: Shapefile (.zip) 
  • Give the file a name under Output file name 
  • Click Run Analysis 

Now ArcGIS online has placed our geocoded data in the Content page. 

Navigate from the Map Viewer to the Content page and note the addition of our new library shapefile layer. Clicking on the layer name will provide us with more information about the shapefile and allow us to download, publish, update, and share our data. Simple click Download to download the new geocoded shapefile. This newly created point data can now be opened in any GIS software. 

Learn how to access the ArcGIS World Geocoding Service through ArcGIS Pro 
  1.  Open ArcGIS Pro and sign into you ArcGIS Online account. 
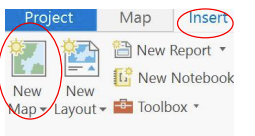
  2. Click on the Insert tab and open a New Map.  

geocoding with ArcGIS Pro

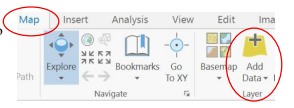
    3. Next, navigate to the Map tab and click Add Data to add the libraries.csv file to your new project.  

geocoding with ArcGIS Pro

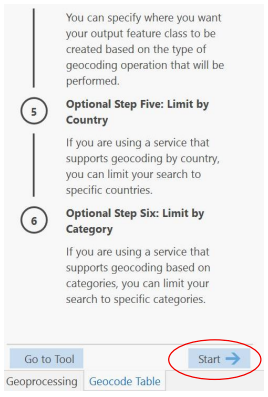
    4. In the Contents pane, right click on libraries.csv and select Geocode Table. This will open a new window in your project to begin the geocoding process. Click Start at the bottom of the Geocode Table window. 

geocoding with ArcGIS Pro

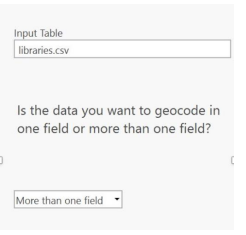
    5. For Input Table select libraries.csv and specify that the address data is parsed into More than one field. Click Next. 

geocoding with ArcGIS Pro

Next, we will specify the locator we want to use for our geocoding. We will use the ArcGIS World Geocoding Service. Learn more about locators here

     6. For Input Locator select ArcGIS World Geocoding Service and click Next. 

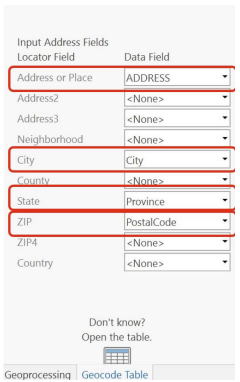
     7. In this step we need to specify which fields in our libraries.csv file correspond to the Input Address Fields outlined in the locator. 

geocoding with ArcGIS Pro

   8. Save the geocoded results to an appropriate location on your computer and click Next. 

   9. Select the country of the geocoded locations. 

  10. Before running the geocoding tool, review the Input Table, Input Locator, and Address Fields. Click Run.   

Building your own address locator by ArcGIS Pro (restricted to SFU users)

If you have hundreds of thousands of addresses or more, you can use a programming language to call a geocoding service (linked in the above "Programming languages" section), or you can create a custom locator in ArcGIS Pro to geocode using your own data. Read Esri's guide Create a locator to learn how. 

You will need reference data to build your own locator. DMTI's RoadsNetworkQGIS (part of the CanMap Content Suite, v2022.3) is a good option.